
< Spring Boot > ThymLeaf
ThymLeaf 란 ?
'템플릿 엔진'의 일종. html 태그에 속성을 추가해 페이지에 동적으로 값을 추가하거나 처리할 수 있다.
tymeLeaf 의 간단한 예제를 코드로 보여드리겠습니다.
우선 controller 부터 생성합니다.
package comfullstack2.ph1.controller;

import org.springframework.stereotype.Controller;
import org.springframework.web.bind.annotation.GetMapping;
import org.springframework.web.bind.annotation.RequestMapping;
import lombok.extern.log4j.Log4j2;


@Controller
@RequestMapping("/sample")
@Log4j2
public class SampleControler {


    @GetMapping("/ex1")// ex1 이라는 path 로 요청이 오면 응답.
    public void ex1() {
	// 로거 출력.
	log.info("ex1 요청이 수행되었습니다");

    }

}
@controller 를 이용하면 부트에서 컨트롤러로 인식되어집니다.
@requestMappring 은 요쳥에 대한 컨덱스트 패스를 설정한다.
(ex) "/test" 는 localhost:portNum/test 라는 요청이 오면 이 컨트롤러가 응답한다 라는 의미이다.
값을 주지 않으면 기본적으로 root path 가 설정된다.
Log4J2
현업에 가면 가장 많이보는 로거이다.
이 로거는 프로그래밍 시 서버로그, 쿼리로그 등을 콘솔에 모두 출력하는 라이브러리로 가장많이 쓰인다.
부트는 기본적으로 이 로거를 사용하므로 의존성 추가는 하지 않고 컨트롤러 상단에 @Log42j2 선언만 하면된다.
보안 이슈로 인해 log4j 는 더이상 사용안한다.
다음은 viewer를 통해 thymleaf 를 생성해보겠습니다.
<!DOCTYPE html>

<html xmlns:th="http://www.thymeleaf.org">
<head>
<meta charset="UTF-8">
<title>타임리프 첫 페이지</title>
</head>
<body>
	<h1>이건 HTML 태그의 기본 내용입니다.</h1>
	<h1 th:text="${'hello Thymeleaf'}">이건 타입리프의 출력 내용입니다.</h1>
</body>
</html>
html 선언 태그 내부에 xmlns 라는 xml 규칙 이름을 반드시 선언해야 타임리프 사용가능하다 .
collection 순회를 통해 dto 에 데이터들을 순회하는 방법을 코드와 함께 알려드리겠습니다.
controller 를 이용한 collection 순회를 통한 dto 데이터 출력
1. controller 에 사용할 DTO 를 생성한다.
package comfullstack2.ph1;

import java.time.LocalDateTime;

import lombok.Builder;
import lombok.Data;

@Data
@Builder(toBuilder = true)
public class SampleDTO {

    private Long sno;
    private String first;
    private String last;
    private LocalDateTime regTime;

}
controller에 로직을 작성한다.
package comfullstack2.ph1.controller;

import java.time.LocalDateTime;
import java.util.List;
import java.util.stream.Collectors;
import java.util.stream.IntStream;

import org.springframework.stereotype.Controller;
import org.springframework.ui.Model;
import org.springframework.web.bind.annotation.GetMapping;
import org.springframework.web.bind.annotation.RequestMapping;
import org.springframework.web.servlet.mvc.support.RedirectAttributes;

import comfullstack2.ph1.SampleDTO;
import lombok.extern.log4j.Log4j2;


@Controller
@RequestMapping("/sample")
@Log4j2
public class SampleControler {


    @GetMapping({"/ex2"}) // 배열 방식으로 요청 패스를 , 를 기준으로 나열 할 수 있습니다.
    public void ex2(Model model) {
	List<SampleDTO> list = IntStream.rangeClosed(1, 20)
				.asLongStream()
				.mapToObj(value -> {
				   SampleDTO dto = SampleDTO.builder()
					   	   .sno(value)
					   	   .first("first" + value)
					   	   .last("last" + value)
					   	   .regTime(LocalDateTime.now())
					   	   .build();

				   return dto;

				}).collect(Collectors.toList());

	// Model 객체는 Business 로직을 처리하는 객체라고 했듯이, 처리된 결과를 viewer 에서 사용하게 된다.
	// 이때 Model 객체를 특정 영역 속성을 이용해서 뷰어에게 넘겨주는데,
	// 이때 사용하는 메서드가 jsp 에 봤듯이 setAttribute 이다.
	// 이렇게 하면 viewer 에서 key 를 찾아서 value 를 보여주는 역할이다.

	model.addAttribute("list", list);
 }
}
이제 viewer 인 ex2.html 을 생성해야하는데 ex2 는 sample 이라는 폴더 하위에 있는 html 파일로 생성해줘야한다.
path 생성 방법
1

2
3
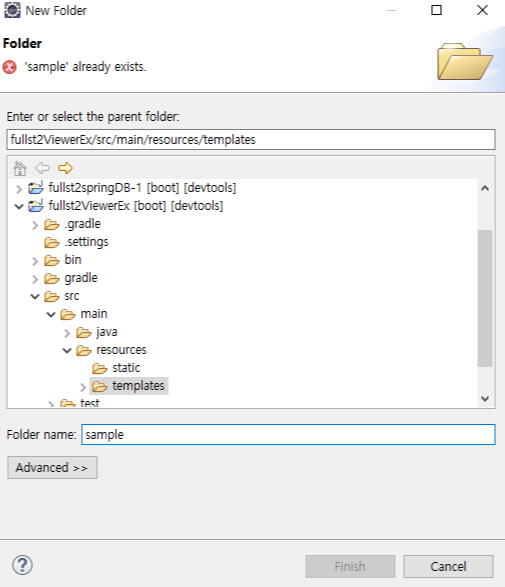
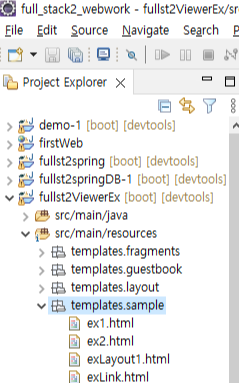
이렇게 생성된다.
여기서 이제 ex2.html 을 생성한다.
ex2.html
<!DOCTYPE html>
<html xmlns:th="http://www.thymeleaf.org">
<head>
<meta charset="UTF-8">
<title>th 태그의 컬렉션 순환 예제</title>


</style>
</head>
<body>
	<ul>
		<li th:each="corona : ${list}">
			<!--th 태그를 html 태그 밖에서 사용 할 때는 th 속성을 뺴고 리터럴 문자를 사용해서 변수를 표현한다. -->
			[[${corona}]]
		</li>
	</ul>


</body>
</html>
컬렉션을 순회 하는 대표적 속성으로는 each 속성이 있습니다.
${모델에 연결된 컬레션 key 명} 을 기준으로 each = "객체 ref(변수명)"을 통해 객체에 접근 가능하다.
실행결과

이번에는 tymleaf 를 이용한 조건문을 설명하겠습니다.
th:if 태그의 조건
if(조건식) unless(조건식) 기본적으로 html 태그 내부에 위치에서 조건 처리한다.
if 안에 if 가 올 수 있고 unless 안에 if 가 올 수 있다.
위에서 생성한 controller 와 dto를 이용한 코드로 에시를 보여드리겠습니다.
<!DOCTYPE html>
<html xmlns:th="http://www.thymeleaf.org">
<head>
<meta charset="UTF-8">
<title>th 태그의 컬렉션 순환 예제</title>

<style>
.redColor {
	background-color: red;
}
</style>
</head>
<body>
	<!-- 이 객체에는 index 라는 속성이 있어서, 현재루프 index 를 리턴한다.  -->
	<ol>
		<li th:each="dto : ${list}"><span th:if="${dto.sno % 6 == 0}"
			th:text="${'6의 배수임..'}"></span> <span th:unless="${dto.sno % 5 == 0}"
			th:text="${dto.last}"></span></li>
	</ol>
	<hr>
</body>
</html>
여기서 코드를 보면 알겠지만 span 태그로 if 절 unless 절을 나누었고,
th:if 문 다음에 th:text 를 넣어 조건이 충족될 시 출력될 텍스트를 넣었습니다.
실행결과

5의 배수인 것은 값이 출력되지 않고 6의 배수인 것은 6의 배수임.. 으로 출력되며 두 조건에 포함되지 않는 값은
dto에서 따로 설정한 값이 출력되는 것을 볼 수 있다.
Tymleaf 에 삼항연산자
타임리프에서 삼항연산자는 자바와 다르게 true 값과 false값 사이에 " : " 를 빼준다.
하지만 th:block 태그에는 자바와 같이 : 를 넣어준다.
예제를 보여드리겠습니다.
<!--자바의 삼항 연산자와 같다. ${조건식} ? true 시 리턴값 또는 표현식 얘는 : 이 없다.  -->
	<ul>
		<li th:each="dto : ${list}"
			th:class="${dto.sno % 5 == 0} ? 'redColor'" th:text="${dto}">
	</ul>
실행결과

ThymLeaf 설정 법

추가로 자동완성 하는 방법도 설명해드리겠습니다.
1

2
work with 칸에 다음 url 을 입력해줍니다.
http://www.thymeleaf.org/eclipse-plugin-update-site/
Thymeleaf Eclipse Plugin Update Site
This is the Thymeleaf Eclipse Plugin Update Site... but if you're reading this, then you're visiting with a browser. Instead, open up Eclipse and point it to this update site. In Eclipse, go to Help >> Install New Software... then enter this update site UR
www.thymeleaf.org
입력 후 enter !!
3

install 후 restart 하면 install 끝!
이것으로 타임리프에 관한 간단한 예제와 함께
간단한 사용법을 소개를 끝내겠습니다.